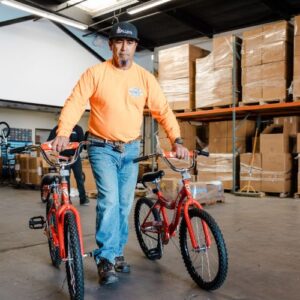
Getting ready for your upcoming bike team building activity? You’re about to make a big difference for foster youth in your community, and we want to make sure your bikes are ready to ride safely and joyfully! While we include printed bike team building activity instructions at every event and will help guide you through the activity, we know some teams like to review tips in advance to avoid mistakes that can lead to extra fixes or delays.
Here’s a quick guide to help your team build each bike with confidence!
Preparation
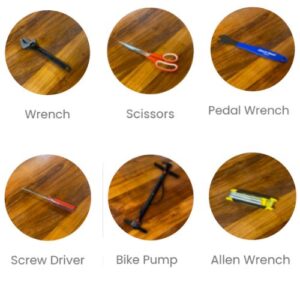
Tools: Each bike build needs an Allen wrench, an adjustable wrench, a Phillips head screwdriver, a bike pump, a pedal wrench, and scissors. Your build will come with all of the tools you need! Place one full set with each bike box.
Make space: Allow about a 5-foot radius (two arm lengths) per bike so everyone can move around comfortably.
Team size: We suggest 1–2 people for small bikes, and up to 3 for larger bikes.
Check instructions: Printed instructions are inside each bike box — review carefully before starting.
There are different sized bikes to choose from, to comfortable accommodate children of every age. These can range from 12″ to 26″.
Your bike might have also come with a customizable “license plate” or postcard to add a personalized touch for a child in foster care!
EXTRA TIPS:
Watch out for staples! Boxes have large staples that can be sharp when opening.
Participants under the age of 10 should have an adult to help supervise.
Bike Build Team Building Activity Instructions
The Bike Build service activity is done in partnership with a third party and so models may vary, but bike instructions can be found inside each bike box! Here are some general guidelines:
Parts for bikes include the frame, front and back wheels (plus 2 training wheels depending on size of the bike), handlebars, pedals, seat, brake line, and small parts bags.
Unbox all parts and double check you have everything you need to build the bike. If you are missing something, please reach out to a Foster Love representative and we can provide you with replacement parts.
Typically, you attach the front wheel, handlebars, seat, pedals, and small accessories. The frame, rear wheel, and drivetrain are pre-assembled.
Specifics like bolt torque or brake cable routing can vary by model.
General instructions for most brands like Schwinn and Mongoose:
1. Install the seat post and seat
Insert the seat post into the frame.
Adjust to a roughly correct height and tighten the seat clamp bolt firmly.
2. Attach the handlebars
Slide the stem into the front fork’s steerer tube.
Align the handlebars straight with the front fork.
Tighten the stem bolt(s) securely.
3. Install the front wheel
Place the front wheel between the fork dropouts.
Insert and tighten the axle nuts or quick release lever (depending on the bike).
Check that the wheel is centered and spins freely.
4. Install the pedals
Identify right and left pedals (usually marked “R” and “L”).
Thread pedals in carefully by hand first — they screw in opposite directions.
Tighten securely with a pedal wrench or adjustable wrench.
5.
Attach the front brake (if separate)
Many kids’ bikes come with pre-installed brakes, but if not, attach the brake cable and align pads so they hit the rim squarely.
Test lever tension and adjust as needed.
6. Install reflectors and accessories
Add front and rear reflectors, and any extras like bell or basket.
7. Inflate tires
Use a pump to inflate tires to recommended PSI.
8. Final safety check
Check all bolts and nuts are tight.
Spin wheels to ensure they’re straight and turn without resistance.
Squeeze brakes to ensure they engage properly.
Wiggle handlebars and seat to confirm they’re secure.
After You Finish
Tool return: Put tools back in their original box and attach the included return label to ship them back to Foster Love.
If you have extra time, create cards or license plates to personalize each bike. Just remember:
No personal contact info
Only new items
No food or religious items
Make sure things are age-appropriate (stickers, water bottles, books, etc.)
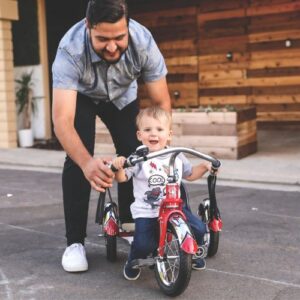
By following these steps, you help ensure each bike is ready to safely ride. Thank you for helping foster youth enjoy their new bikes and start creating fun memories!
Help us connect you with the right member of our team by sharing the basics of your brand or foundation.
"*" indicates required fields
ALLIES
PARTNERSHIP INCLUDES
Opportunity For Activation Of ‘Ally Level’ Sponsorship During One Special Event Or Campaign: Foster Care Awareness Month (May), Back to School (Aug/Sep), Disney Days (May & Sept), Giving Tuesday (Nov)
Live Check Presentation With Foster Love Representative
Custom Impact Reports
Press Release & Video Announcing Partnership
Social Media Post Highlighting Partnership
Table At Foster Love Gala
Featured As ‘Ally Level’ Sponsor On Foster Love Website & Annual Report
Opportunity For Activation Of ‘Champion Level’ Sponsorship During One Special Event Or Campaign: Foster Care Awareness Month (May), Back to School (Aug/Sep), Disney Days (May & Sept), Giving Tuesday (Nov)
Co-branded Video Of Live Check Presentation And Interview of ‘Champion Level’ Brand Representative
Custom Impact Reports
Press Release & Video Announcing Partnership
Social Media Post Highlighting Partnership On Foster Love Social Media Channels
2nd Partnership Video Emphasizing Impact Of Partnership
Table At Foster Love Gala
Featured As ‘Champion Level’ Sponsor On Foster Love Website & Annual Report
Opportunity For Activation Of ‘Superhero Level’ Sponsorship During One Special Event Or Campaign: Foster Care Awareness Month (May), Back to School (Aug/Sep), Disney Days (May & Sept), Giving Tuesday (Nov)
Co-branded Video Of Live Check Presentation And Interview of ‘Superhero Level’ Brand Representative
Custom Impact Reports
Press Release & Video Announcing Partnership
Social Media Post Highlighting Partnership On Foster Love Social Media Channels
2nd Partnership Video Emphasizing Impact Of Partnership
Table At Foster Love Gala
Featured As ‘Superhero Level’ Sponsor On Foster Love Website & Annual Report